I LOVE meeting new people. For those of you that know me, I am social and would be lost without interaction. I know being social is harder for some people. They get nervous talking to strangers or hate the feeling of butterflies when they are going on a blind date or lunch meeting with someone they have never met. I challenge you to do something new this week -
buy coffee for someone you do not know that well or have never met this week.
Maybe this is someone you have been emailing at work and have never met face to face. This could be a homeless person that is holding a sign on the corner. Or an acquaintance that is going through a tough time and might need a shoulder to lean on. Just do it. Don't over think it. You never know when it will change your life. Oh, and tell us about your experience.

Tuesday, September 25, 2012
Tuesday, September 18, 2012
The Art of the Goal

I used to make a to do list every morning. If I didn't finish everything on the list that day, I would just move it to the next day. Slowly, the list got longer and longer until I would dread looking at it. I knew something had to change. 2012 and turning 30 brought so many feelings of urgency to accomplish things or change certain things in my life. Those lists included small tasks I had to go, but lacked things like learn to sew, try new foods, travel to those places that make my heart skip a beat and make my marriage stronger. Those were some of the things that should have been on that list but the list was so long there was no room for the things that really mattered.
I began to analyze why I wasn't making changes or feeling fulfilled, and moving to Minnesota gave me more time to think about this. I wanted to help people, to learn new things and to experience life...really experience it. I decided to pick a new goal every month. My to do list would include at least one small thing a day or every other day to get me closer to that goal. Each goal includes a specific thing that is measurable (not to lose weight but to have a specific, measurable goal like join a new workout class or take something bad out of my diet), has a deadline, and is completely realistic and obtainable. If your goal is huge, break it down into a little chunk. If you want to lose 50 pounds, start with a smaller goal such as going to the gym twice a week. Then add diet changes and walking the dog twice a week. See, breaking it down makes it way easier to get there.
My first goal was to learn to sew. I decided the best way to do this to just join a quilting class, forcing me to learn to sew quickly and learn something challenging in the process. My first class was hilarious as the teacher showed me how to turn the machine on and thread a bobbin. By class four, I was actually sewing in a straight line and by the final class, I had a small baby sized quilt and a new sewing machine. When I would go home, I would rewrite out the instructions. Each day, I collected sewing projects to do on pinterest. Another to do was to actually purchase the sewing machine. Do you see what I mean by breaking each goal into miniature steps to help you accomplish what you want? It works.
I realized that when I had a goal written out and paced somewhere where I would see it everyday, it was more likely to get accomplished. I now make one big goal a month and smaller goals per week. the larger goals may span over the course of several months, but I work really hard at adding activities to my to do list that help me accomplish my goals. Another thing that changed was I was only able to add five things to my list everyday. Most of the time, I can definitely accomplish five things. Any more and I just cannot keep up. But five things is doable. I realized lately that life is flowing my smoothly and I have time for many of the things that really matter. I think my goals are the secret.

I use this post it note goal sheet to be able to change them weekly, and the larger goal is always top left. Good luck accomplishing your goals!
Wednesday, November 23, 2011
Beef Roast with Parsley Tomato Sauce
Giada is my hero - gorgeous, and boy can she cook. I bought a beef roast at a local market by our house and stared at it when I got home. I had never cooked a beef roast, and didn't even know where to start in making this meat into something the hubby would eat. I knew where to turn when Giada popped into my head. I came across this Beef Roast with Parsley Tomato Sauce recipe, and I gave it a go. I also had potatos and carrots in the fridge, so i used those as a side. I saw Jamie Oliver (is everyone that cooks adorable?) teaching how to roast the perfect potato, so I used his tricks and they turned out divine. He boils the potatoes and carrots for 10 minutes, removes the carrots, and then fluffs the potatoes in the colander prior to roasting. You then get a slightly crispy outside of the potato. So good!!

Beef Roast with Spicy Parsley Tomato Sauce
Ingredients:
1 (2 to 2 1/2 pound) sirloin tip or chuck roast
3 tablespoons olive oil
4 roma tomatoes, hlaved lengthwise
2 teaspoons herbs de Provence (I didnt' have this so I just threw a couple other herbs on there)
Kosher Salt and Fresh Ground Pepper to Taste
1 1/2 cups fresh flat-leaf parsley
2 garlic cloves
1/2 teaspoons red pepper flakes
3/4 teaspoon kosher salt
3/4 teaspoon freshly ground black pepper
2 tablespoons red wine vinegar
1/2 cup extra virgin olive oil
Directions:
1. Preheat the oven to 375 degrees. Season the beef with salt and pepper. Season the tomatoes with salt, pepper, and herbs de provence.
2. Heat the olive oil in a medium, heavy roasting pan or dutch oven over high heat. Sear the beef on all sides until browned. Place the seasoned tomatoes around the seared beef and place the pan in the oven.

3. Roast until a meat thermometer reads 130 degrees F for medium rare, 135 degrees for medium, which is about 30 to 40 minutes. Tent the roast loosely with foil and let it rest for 10 to 15 minutes. The internal temperature of the meat will rise 5 degrees F more and the juices will redistribute into the roast.
4. While the meat rests, place the parsley and garlic in a food processor and pulse until the parsley is finely chopped. Add the red pepper flakes, salt, red wine vinegar, and the roasted tomatoes and process until pureed. With the machine running, add the olive oil in a steady stream. To serve, slice the roast and arrange on a serving platter. Drizzle a little sauce over the meat. Serve the remaining sauce in a bowl alongside.

That dinner was fabulous!!! And I even made some amazing peanut butter cookies for dessert!

Beef Roast with Spicy Parsley Tomato Sauce
Ingredients:
1 (2 to 2 1/2 pound) sirloin tip or chuck roast
3 tablespoons olive oil
4 roma tomatoes, hlaved lengthwise
2 teaspoons herbs de Provence (I didnt' have this so I just threw a couple other herbs on there)
Kosher Salt and Fresh Ground Pepper to Taste
1 1/2 cups fresh flat-leaf parsley
2 garlic cloves
1/2 teaspoons red pepper flakes
3/4 teaspoon kosher salt
3/4 teaspoon freshly ground black pepper
2 tablespoons red wine vinegar
1/2 cup extra virgin olive oil
Directions:
1. Preheat the oven to 375 degrees. Season the beef with salt and pepper. Season the tomatoes with salt, pepper, and herbs de provence.
2. Heat the olive oil in a medium, heavy roasting pan or dutch oven over high heat. Sear the beef on all sides until browned. Place the seasoned tomatoes around the seared beef and place the pan in the oven.

3. Roast until a meat thermometer reads 130 degrees F for medium rare, 135 degrees for medium, which is about 30 to 40 minutes. Tent the roast loosely with foil and let it rest for 10 to 15 minutes. The internal temperature of the meat will rise 5 degrees F more and the juices will redistribute into the roast.
4. While the meat rests, place the parsley and garlic in a food processor and pulse until the parsley is finely chopped. Add the red pepper flakes, salt, red wine vinegar, and the roasted tomatoes and process until pureed. With the machine running, add the olive oil in a steady stream. To serve, slice the roast and arrange on a serving platter. Drizzle a little sauce over the meat. Serve the remaining sauce in a bowl alongside.

Thursday, November 17, 2011
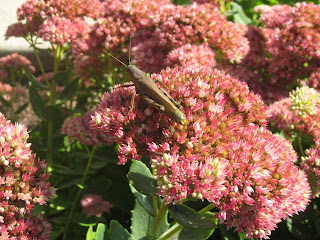
Grasshoppers Galore
When I was watching Bug's Life when I was little, I always wondered about some of the bugs. Back in Vegas and California, we didn't encounter very many bugs. If you did, they were your run of the mill spiders or cockroaches. Until I moved to Minnesota, I didn't understand why people complained about bugs. Normally if you were clean and sprayed your house a couple times during the year, you didn't get very many bugs in your house. Well, once we moved to Minnesota my bug tolerance was thrown out the window. There are a lot of bugs here. I was eaten alive by mosquitoes when we first got here until I made my own bug repellent, and couldn't believe the amount of spider webs around our house. We cleaned them, then the next day they were all there again. Those spiders work overtime in the Midwest to make sure you are stuck admiring their webs day in and day out. We have gotten the spider webs under control, but I am continually amazed at all of the new bugs I get to see for the first time.
Our younger golden retriever, Lola, was staring at the same bush for at least 10 minutes and I couldn't wait to check out her new obsession. I smiled when I saw this large bug lifting itself onto the top of this flower as our golden nudged it with her noise to make sure it kept moving. I saw my first grasshopper! They are huge, and they jump and scare the crap out of you every time you walk in the grass.

Our younger golden retriever, Lola, was staring at the same bush for at least 10 minutes and I couldn't wait to check out her new obsession. I smiled when I saw this large bug lifting itself onto the top of this flower as our golden nudged it with her noise to make sure it kept moving. I saw my first grasshopper! They are huge, and they jump and scare the crap out of you every time you walk in the grass.


Wednesday, November 9, 2011
Minnesota Colors of Fall
It is so amazingly beautiful here in Fall. Autumn brings out colors I have never seen before, and I cannot believe how warm the weather has been this year. I guess it is rare out here to be 80 in October, so I am sucking up all of the sun and warm weather I can get. I took a walk through Haas Lake Park with Lola today and captured some of these awesome pics of the leaves changing on the trees behind our house. My photos will never do the colors justice, but you can get the idea.


Tuesday, November 1, 2011
Canning Salsa
I have always wanted to learn how to can vegetables, fruits and fillings. I eat salsa a ton, and started making it for myself so I could make it healthy and the way I want it. (This seems to be a reoccurring theme lately). Canning is always a little intimidating since you don't want to eat food that has gone bad, which is my biggest fear. I decided to dive in head first.

Ingredients:
4 cups of tomatoes (I recommend roma tomatoes as they are not as liquid)
2 peppers (or more if you want it really spicy)
1 cup of chopped onion
1 clove of garlic
1 tsp salt
Pepper to taste
1/2 bunch of chopped cilantro
1/2 tablespoon of cumin
Lime Juice
A sprinkle of sugar
Directions:
1. Prepare your canning jars by washing them in hot, soapy water. I always keep the jars warm so they don't break. Fill your stockpot with enough water to cover the jars with at least one inch of water and heat to a simmer.
2. Combine all of the ingredients in a food processor and pulse until mixed.
3. In a large stainless steel saucepan, bring to a boil over medium heat, stirring frequently, until slightly thickened. I recommend about 10 minutes or so.
4. Ladle the salsa into jars, leaving 1/2 inch headspace. Remove the air bubbles by running a plastic knife along the sides, and remeasure headspace. Wipe the rim, and center lid on jar. Screw the band until it is fingertip-tight, but now really tight.
5. Process the filled jars in boiling water for 20 minutes. Remove the stockpot lid. Wait for 5 minutes, then remove jars. Cool the jars and store for up to one year.

Update - There will be standing liquid towards the bottom, which is normal. You should shake up the salsa prior to using. Roma tomatoes eliminates the excessive liquid seem in these pictures, which I found out the second time around.
Wednesday, October 26, 2011
DIY Cornhole Game Boards
I wanted to make something awesome for my hubby, Matt, for his upcoming birthday. He mentioned a cornhole set (or bean bag toss, as some of you in the Midwest call it) a couple of times, and again at our housewarming party. I decided to give it a go, since I had already been doing a ton of painting and staining work around our house. I figured it couldn't be too hard.
I found the basic cornhole measurements on the Master Cornhole Association website so it would be competition ready. And off I went.
Cut the 2×4’s. You will need 4 pieces at 21-inches each and 4 pieces at 4-feet each.


Materials Needed for Cornhole Boards:
Two pieces of ½ inch thick plywood cut to 2-foot x 4-foot
Four, 8-foot 2×4’s
Four, 4½ – inch long, 3/8-inch long carriage bolts
Four, 3/8-inch flat washers
Four, 3/8-inch wing nuts
1 box of 2½-inch wood screws
wood filler
Paint and Poly Sealant
I found the basic cornhole measurements on the Master Cornhole Association website so it would be competition ready. And off I went.
Cut the 2×4’s. You will need 4 pieces at 21-inches each and 4 pieces at 4-feet each.

Using the 4-foot and 21-inch pieces, construct the tables’ frames with wood screws.


Measure 9-inches from the top of the plywood pieces and 12-inches from the sides and mark a center point for the hole. Use a compass to draw a circle 6-inches in diameter. Cut
the hole with a jigsaw.
the hole with a jigsaw.


Using the remaining 2x4 pieces, I cut four pieces for the legs of the boards. They will need to be at least 12 inches long. I rounded the opposite ends of the legs so I could fold them away for storage. I drilled a hold in the frame and through the rounded end of the leg to attach. I didn't get pictures of this since I was doing it alone and couldn't hold the camera and attach the legs. The carriage bolts will fit through the holes, where you can then attach the washer and wing nut. I then set them up, measured so they were exactly 12 inches off the ground to the top of the board, and sanded them down so they sat evenly. I sanded the crap out of the top and sides, over and over again until they were really, really smooth. Then you can paint them however you want. You can add a poly coat to keep them smooth and protected. Here's the finished product. The hubby loved them!


Subscribe to:
Posts (Atom)